Unraveling ‘Ocean Strike’ – a crypto-mining threat

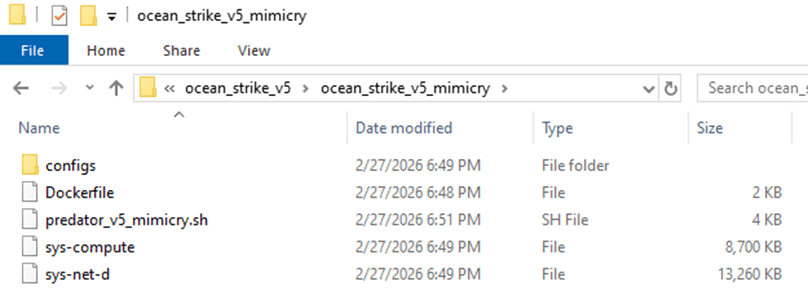
While doing some pivoting on emerging Command and Control servers, I identified an open-directory on an IP Address (144.31.106[.]169) hosting what appeared to be a collection of malicious shell scripts, as shown below.

Initial Open Directory Contents
Contents of ‘stagers’ directory

Peering into the first shell script, ‘mimicry.sh’, its purpose appears to be serving as a staging script for the actual payload – ocean_strike_v5.tar.gz – curling the payload into /tmp/.sys-task, extracting it, starting a secondary shell script, then deleting the previously created directory.  Let’s take a look inside ocean_strike_v5.tar.gz.

mimicry.sh
ocean_strike_v5 contents

The script of interest, ‘predator_v5_mimicry.sh’, is a shell script designed to perform the following actions:

  • Checks if it is running insider a container, sandbox, WSL, or other virtualization environment using /proc/1/cgroup
  • Adds an SSH key to /root/.ssh/authorized_keys to maintain persistent access to the compromised device
  • Attempts to set vm.nr_hugepages=1280 – increasing performance of certain workloads, including crypto-mining
  • Attempts to identify any other mining-related processes and kill them, including anything that mentions guard, miner, YDServi, xmrig, nanominer, kdevtmpfsi, gost, pcpcat, or proxy.sh
  • Creates directory /dev/shm/.sys-cache and copies some of the above files into it – sys-compute is copied as kworker and made executable.
    • A service is also installed named ‘System Monitoring Service’ to ensure it is always running.
  • The malware then configures what it refers to as a Mimicry Proxy via the binary sys-net-d seen above – this is installed into /usr/bin/sys-net-d with a service setup named ‘Network Monitoring Service’.
  • The malware then attempts to build something it refers to as a ‘Mimicry Aquarium’ using the contained docker file, spawning a container named ‘sys-aquarium-mimicry’ and mapping host port 2376 to container port 2375.
    • The container appears intended to serve as a distraction for other attackers – it installs some common Linux utilities such as curl, wget, etc, creates fake artifacts like /root/proxy.sh, creates a cron job without actually enabling it to run proxy.sh every 30 minutes, then creates an empty file at /var/run/docker.sock
    • The container itself is used to return a general HTTP 200 Status in response to any request to port 2375, the Docker Remote API.
  • The attacker then uses iptables to redirect any inbound request destined for port 2375 to port 2376 – effectively capturing traffic destined for the Docker Remote API into the container, which then supplies a ‘fake’ response.
    • This is done seemingly to prevent any additional tampering or exploitation from occurring that may interfere with their mining services.
    • Their own IP address is excluded from this port mapping rule via iptables
  • Finally, the attacker writes to a file called /dev/shm/.sys-cache/watchdog.sh a bash script that periodically wakes and checks 144.31.106[.]169 for a 200 OK response – if it is not received, it clears all iptables pre-routing and restarts the main docker service.
    • This is to ensure access to the true Docker API port is available remotely again for a potential re-compromise

In total, the malware attempts to find and kill competitors, deploys persistence via system services, runs a Docker container to proxy traffic to the Remote Docker API port, deploys a crypto-miner onto the device, and implements a dead mans switch designed to clear the routing trap should the main IP address fail to respond.

Dead Mans Switch in predator_v5_mimicry.sh

After some research, I reached the following conclusions:

  • sys-net-d appears to be a Sliver agent payload (tracks with Sliver C2 exposed on the IP address already).
  • sys-compute is an XMRig mining binary, avoiding the overhead of having to download it dynamically on victim systems.

While digging into other directories, I found multiple older versions of their persistence and deployment scripts along with potential targets in the ‘ocean_strike.tar.gz’ file, as shown below:

Contents of ocean_strike.tar.gz

The observed sys-net-d and sys-compute are the same Sliver payload and XMRig binary previously noted.  There are variations of persistence scripts present, but all ‘deployer’ scripts are 0-byte files as of the time of this analysis.  Sys-guard is a simple shell script that configures ocean-miner along with a decoy Docker container, another variation of Monero mining.

What’s more interesting is the files labelled ‘fortress_results’ – these appear to be scans of potential victim IP addresses – each victim had an exposed Remote Docker API port that the threat actor tested to determine the level of access they could achieve remotely, attempting to create a privileged container to facilitate mining operations.

fortress_results_v2 demonstrating attempts to create privileged containers on exposed Docker instances across the Internet on a variety of victim networks

Revisiting one of the earlier files, we identified another Monero miner staging script named ‘cuckoo_stager.sh’.  This is similar to the ‘Ocean Strike’ payload but had slightly different checks for containers, competitors, deployment, persistence, and fail-over operations.  A snippet is shown below.

cuckoo_stager.sh snippet

In essence, this script attempted to:

  • Identify if it’s in a container via the presence of ‘docker’ in /proc/1/cgroup and also checking for the presence of systemd
  • Kill other competing mining processes
  • Download xmrig and Yggdrasil payloads binaries from the main control address (144.31.106[.]169)
  • Configure and launch xmrig for Monero mining
  • Persist itself via cron jobs
  • Hide initial access by deleting bash history and timestomping xmrig binary and configuration files to appear older than they are
  • Delete the initial stager (/tmp/cuckoo_stager.sh)
  • Then, optionally, starting Yggdrasil mesh network in an attempt to obfuscate traffic destinations and avoid initial detection at the network level

There was a final script named ‘dead_man_switch.sh’ that appears similar in nature to the fallback utilized in the original ‘Ocean Strike’ script in that it periodically checks if a specific heartbeat is being populated – if no heartbeat is detected after a 30 minute period, it assumes there is a catastrophic error with the script and attempts to re-expose the original Docker API ports instead of the mimicked port so that remote access can once again be gained by the actor.

dead_man_switch.sh snippet

Conclusions

This is an interesting malware variant that is explicitly targeting the Remote Docker API in an attempt to create high-privileged containers on exposed ports that are then leveraged to instantiate Monero-mining operations – this is not a new technique, but it is still interesting from a defensive perspective to study the source and implementation so that we can further harden relevant systems.

Once the malware is deployed, the Docker API port (2375) is then proxied to 2376 via a ‘decoy’ container and iptables, likely to ensure that other actors cannot launch competing resources – but in such a way that the C2 IP address can still reach the original port without interference.

Monero mining attacks are not new and neither is inhibiting further use of the Remote Docker API (https://www.akamai.com/blog/security-research/new-malware-targeting-docker-apis-akamai-hunt) – but the naming conventions and strategies used here seem to indicate this may be part of a more organized campaign.

Be on the lookout for the below indicators in your network.

Indicators of Compromise

  • 144.31.106[.]169
    • C2 Address
  • 45g4uGaXz3PeaN94ns6CwXDa2oxNFKrYPAEjqZSjhem2RQju9JtuQgbSLrvq9pN35dUeUgS8996G7P9eZ9bX78m4CjwGeP3
    • Monero Wallet
  • cuckoo_stager.sh
    • Payload Variation deploying mining, persistence, etc
  • mimicry.sh
    • Shell Script serving as Initial Access payload
    • SHA256: 148b56141e04ff98c408c50320eb76398854f0a071c3276779b8d0db99332157
  • predator_v5_mimicry.sh
    • SHA256: dba481116b7c451bf018518c02431b3c342c92c047d77ceaacedcf6a44e376c4
  • dead_man_switch.sh
    • SHA256: 31a4271fc2c4ab2a7939358f98e7cb339115ede6180a500f7a441b468e09a8d6
  • persist.sh
    • SHA256: 5e37c6b3bf5192e334d6ff0c5995f73f60b27b18cbdcedcbcc579d32aeea2e7c
  • persist_v4_proxy.sh
    • SHA256: 8ceebbd3112d462ff6aa00b6e5330b75d29c872ee8dee86bbba968c88fea857a
  • predator_v3_ocean.sh
    • SHA256: a07a12709f8fef2b4667fcbd8947f670f2bfbf92751553184fb3ed8f93679537
  • sys-compute
    • XMRig Binary
    • SHA256: 92dcc363ed05c5e4ae9008f7d0d41b1ad1ae9caead9d4f3598c566b185078b4b
  • sys-net-d
    • Sliver Payload
    • SHA256: 448fbd7b3389fe2aa421de224d065cea7064de0869a036610e5363c931df5b7c
  • sys-guard
    • Shell Script configuring ocean-miner
    • SHA256: 3aad38a1792dfeede3cb47181bd3570047e3c71b659ebdf811fc5e2bae0bc9d5
  • /dev/shm/.sys/, /dev/shm/.sys-cache
    • Directories created to host payloads/binaries/configs

Analyzing publicly-exposed Cobalt Strike beacon configurations

When it comes to attacker infrastructure, some threats are more stealthy than others. Searching “cobalt strike beacon” in Shodan or similar tools can reveal exposed Teams Servers that are not properly protected from the public eye – as shown below.

Example Cobalt Strike beacon configuration results from Shodan

Additionally, these servers often expose details of configured beacon behavior that can be used to study how attackers are setting up initial payload functionality – an example is shown below.

Example beacon configuration screenshot from Shodan

These types of details are invaluable and allow us to study the settings attackers are using for their Cobalt Strike payloads – often these carry over into other frameworks as well such as Sliver, Mythic, etc. In this post, I present a statistical summary of beacons exposed at the time of this writing to help suggest detection and hunting ideas for blue teams.

One of the most obvious things we can look at first is understanding the type of beacons that threat actors are using – Cobalt Strike supports a variety of types including HTTP, HTTPS and DNS – threat actors today typically use HTTPS, as evidenced in the below analysis (with DNS being exceedingly rare due to how slow they are to interact with).

Cobalt Strike Beacon Types

When threat actors are setting up an HTTP-based beacon, they must configure different properties such as the URIs that will be invoked, the user agent, the HTTP verbs, etc – so let’s take a look at these – starting with the most common POST URIs setup by actors.

Most common POST URIs for Beacons

A couple of these standout – threat actors really like ‘submit.php’, URIs that appear to be API endpoints and URIs that look like common web-app behavior such as loading jquery. This is good material for pivoting using other material to find potential C2 behavior in your network.

Looking at sleeptime also exposes some interesting data – the vast majority of exposed configurations used the default sleeptime setting of 60 seconds – the next biggest bucket of actors reduced this to 3 seconds – then we can observe a variety of different configurations.

Sleep Time configurations from Beacons – Sleep Time on the left, count of appearances on the right

In terms of TCP Ports, we observe beacons communicating on a wide variety of outbound connections. In my experience doing Incident Response, C2 traffic tends to stick to port 80 or 443 but this is evidence that this is not always the case!

Most common ports for beacon configurations

The above image shows only the most common ports in use – there were dozens of other ports not pictured that were used by 3 or less observed configurations.

What about the HTTP user agent in use? There was a significant amount of variety here (as expected), with configurations trying to impersonate various browsers and devices such as iPads, Mac OS, Windows, etc. The most commonly observed ones are shown below.

Most common User Agents observed in configurations

Let’s now analyze the characteristics of beacon process spawning and injection behavior. Cobalt Strike enables operators to configure ‘post exploitation’ configurations that control how sub-processes are spawned from a primary beacon. The table below represents the binaries that were configured for use with post-exploitation tasks such as screenshots, key-logging, scanning, etc.

x86 spawn_to configurations for Cobalt Strike beacons

As we can see, the most common choice by far was rundll32.exe, followed by svchost.exe, dllhost.exe, WerFault.exe and gpuupdate.exe – but there are definitely some less-observed binaries in the table. I would urge defenders to ensure you are considering all possible hunting options when looking for C2 traffic in your network.

There are many additional aspects of Cobalt Strike configurations that we as blue-teamers can pivot and hunt on throughout our networks – the goal of this is to help shine some light on the most commonly used and abused components so that hunt and detection teams can embrace these attributes and improve their security posture. My hope is that you can immediately take some of these data points and action them internally on your own network for finding suspicious activity, should it exist.

I’ll continue this analysis in an additional post as I dive into other C2 servers and additional discovery mechanisms for Cobalt Strike servers, among other platforms.

Ransomware Simulation Tactics

“The only real defense is active defense” – organizations must be proactive in their pursuit of cybersecurity defense else when a real adversary turns up, they will be completely outmatched.

When it comes to ransomware, enterprises adopt all manner of defensive posture improvements with the goal of early detection and prevention – this usually includes tuning EDR, implementing network segregations, data monitoring mechanisms for the truly mature and sometimes bespoke “ransomware prevention” solutions designed to halt threat actors mid-encryption through agent-based solutions or otherwise.

The one thing that tends to be overlooked is the actual act of adversary emulation – simulating a true-to-life ransomware payload detonation to ensure it will be detected or prevented with current controls.

This is where impact comes in. Impact is a tool I developed to help organization’s be more proactive about their defense and simulate a realistic ransomware threat in their network – it is highly configurable, highly modular and will help blue teams be more confident in their detection and prevention strategies.

Beyond file encryption, impact is designed to truly emulate a modern ransomware payload – this includes a variety of deployment options, offensive capabilities and a modular configuration to tailor it each individual enterprise requirements.

For example, impact offers the below options:

  • Adjust level of concurrency for encryption/decryption
  • Filter by filename/extension/directory for file targets
  • Utilize hybrid encryption to benefit from fast symmetric encryption of file data and protect each symmetric key with an asymmetric public key
  • Capability to create a set of mock data for later encryption/decryption tests
  • Capability to terminate configured processes and services that may interfere with encryption operations
  • Capability to block selected ports/domains via Windows Firewall to tamper with EDR/Backup communications
  • Capability to eliminate all Volume Shadow Service (VSS) copies to tamper with potential backups
  • Capability to tamper with Windows Defender settings
  • Capability to deploy on remote devices from a list of targets or Active Directory using Windows Services, Scheduled Tasks or WMI
  • Capability to enumerate local/network drives for complete system encryption
  • Capability to emulate a number of different ransomware threat actors, including mimicking their commonly used ransomware note names, extensions, note contents and encryption algorithms among other things
  • Implements a configurable intermittent-encryption scheme for efficiency

impact has lots of optional features and modularity to allow it to support a variety of use-cases and requirements when it comes to ransomware simulation on a per-environment basis.

So how do I use it?

At the core, it is extremely simple to ‘just encrypt’ a directory using the following command (you don’t even need to specify a group, it will pick one at random):

impact.exe -directory "C:\test" -group blackbasta -recursive

When you execute this, it will crawl C:\test and encrypt any files matching inclusion/exclusion filters with parameters associated with the BlackBasta group as specified in config.yaml. Each encryption command will generate a corresponding decryption command inside decryption_command.txt – this will typically look something like below:

impact.exe -directory "c:\test" -skipconfirm -ecc_private "ecc_key.ecc" -cipher aes256 -decrypt -force_note_name ReadMe.txt -recursive

impact comes preloaded with embedded public and private keys for use if you don’t want to use your own – it’s also possible to generate a set of keys using the -generate_keys parameter – these can be subsequently fed into impact for use rather than relying on the embedded keys.

impact.exe -directory "\\DESKTOP1\C$\Users" -group blackbasta -recursive -ecc_public ecc_public.key

The above command will force the use of ECC for hybrid encryption and overwrite any group settings. It is also possible to force a specific symmetric cipher via the -cipher argument like below:

impact.exe -directory "C:\test" -group blackbasta -recursive -ecc_public ecc_public.key -cipher xchacha20

Keep in mind – if you supply a personal public key for encryption, you will also need to supply the corresponding private key for decryption!

impact can also create a set of mock data for you to encrypt rather than needing to do that yourself – just run it like below to populate the targeted directory:

impact.exe -create -create_files 12000 -create_size 5000 -directory C:\test

The above command will create 12,000 files with a total approximate data size of 5 Gigabytes in the specified directory – then we can target this directory with encryption/decryption tests as needed.

When checking directories or files to decide if they should be encrypted, impact uses the built-in configuration file (customizable) to apply the following logic:

  • Does the file extension match an inclusion that should be targeted?
  • Does the file name match one that should be skipped?
  • Does the directory name match one that should be skipped?
  • Is the file size > 0 bytes?
  • Does the file extension match an exclusion that should be skipped?

Assuming a file passes these checks, it is then added to the encryption queue. When doing decryption, checks are skipped and every file in relevant directories is checked for encryption signatures to determine if we should attempt to decrypt it.

This pretty much covers the encryption/decryption facilities built into impact – but be aware you can also specify custom ransomware notes, ransomware extensions and a host of other optional features if you need to.

impact also contains a variety of offensive emulations commonly employed by encryption payloads – the ability to kill specific processes, stop specific services, block network traffic by port or domain (resolved to IP address) and attempting to disable/set exclusions for Windows Defender. These are all documented at the command-line level and behave pretty much as you’d expect.

impact can also be deployed remotely via WMI, Windows Service or Scheduled Task – you can supply a list of target hosts via the command-line, an input line-delimited file or have impact dynamically pull all enabled computers from the current Active Directory domain for targeting.

impact.exe -targetad -directory "*" -recursive -public_ecc keyfile.ecc -cipher xchacha20 -ep 50 -workers 50 -exec_method wmi

The above command will pull all enabled computers from AD and copy impact to the ADMIN$ share via SMB then attempt to launch it via WMI – all command-line arguments will be preserved and passed into the created process (minus obvious exceptions such as exec_method and targetad, to name a few).

There are a lot of TODOs, optimizations and features to add to this – but for now, it works and does the job of (mostly) accurately simulating ransomware and commonly associated TTPs.

If you think you can detect ransomware on endpoints or fileshares, try it out and prove it.

If you have any bugs or feature requests, please open an Issue on GitHub or drop me an email at joeavanzato@gmail.com.